
A Guide to Submitting the On-line DS-160
The DS-160 is not complicated, but it requests many details, and the US Department of State CEAC website
can be difficult to navigate and frustrating.
Here are some suggestions to help you navigate the process.
Tips
Be sure you have all your information at hand. The website times out and closes down unexpectedly and without warning. If you have to keep logging in over and over, you may get locked out. Click here to review the kinds of questions you will be asked and the information you must provide.
Be sure you have a dependable internet connection. If your signal drops, your answers may be lost.
Be sure your photo meets the Department of State requirements and can be uploaded quickly and conveniently.
You won't have time to hunt around in your files once you begin the application.
Be sure to save your work often – at minimum twice on each page in order to preserve your data in the event of a timeout.
Your partially completed or draft DS-160 can be saved up to 30 days before submitting.
Remember, submitting the DS-160 creates a permanent record with the Department of State,
so it it’s important to read each question on the DS-160 carefully and respond accurately.
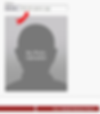
600 pixels
600 pixels

Resolution = 72ppi
-
Start with a good passport photograph that meets Department of State requirements.
-
Have the photograph prepared for upload to the DS-160 form and keep it handy on your computer.
-
It must be square.
-
Your image must be in jpg format and under 240KB.
-
We recommend 600 x 600 pixels at a resolution of 72.
The Photo
Before you begin, have your DS-160 photo readily available for upload to the on-line form.
The photo upload can be the most frustrating part of the whole process. Here is our advice:
The Process
1.
start

Select the location where you will apply for a visa.
Enter the CAPTCHA code.
Select "Test Photo.
Click "Next: Upload Selected Photo"
You will see the file name of your photo.
2.
Upload your photo
Click the
Browse Button
which takes you to your files.

Select your 600 x 600 pixel photo.


3.
success!
Click "Continue using this photo."
You will see the successful result.


4.
continue
You are now ready to complete the form.
You will not deal with your uploaded photo until after you have filled in the Security and Background section.
At that point there will be a button labeled "Photo." Select it, and you are good to go.
This website is for informational purposes only and does not provide legal advice. Please do not act or refrain from acting based on anything you read on this site.